Turn Your Raspberry Pi into a Network-Wide Ad Blocker: A Step-by-Step Guide
Are you tired of seeing ads everywhere you go online? Do you want to block them on all your devices, without having to install individual extensions or applications? If so, then turning your Raspberry Pi into a network-wide ad blocker is the perfect solution for you!
Sick of intrusive ads bombarding your online experience? Tired of individual ad blockers slowing down your devices? Look no further! Turn your Raspberry Pi into a network-wide ad blocker and enjoy ad-free browsing on all your connected devices, including computers, tablets, smartphones, and even smart TVs. See video below for a full video with step by step guide.
Here's a comprehensive guide with detailed instructions, from setting up your Raspberry Pi to configuring your network:
Preparing Your Raspberry Pi:
- Gather your materials:
- Raspberry Pi (any model)
- MicroSD card (8GB or larger)
- Power supply
- Ethernet cable
- Computer with internet access
- Flash Raspberry Pi OS:
- Download the latest Raspberry Pi OS image from https://www.raspberrypi.com/software/.
- Use a tool like Balena Etcher or Rufus to flash the image onto your microSD card.
- Insert the microSD card into your Raspberry Pi.
Installing Pi-hole:
- Connect your Raspberry Pi:
- Plug in the power supply and connect the Ethernet cable.
- Connect a monitor and keyboard (optional, for initial setup).
- Boot your Raspberry Pi:
- Wait for the Raspberry Pi to boot up completely.
- If connected to a monitor, log in using the default username
piand passwordraspberry.
- Access the web interface:
- On your computer, open a web browser and type the IP address of your Raspberry Pi.
- This will take you to the Pi-hole web interface.
- The default IP address is usually
192.168.1.100, but it may vary depending on your network configuration. You can find the exact IP address in your router's DHCP client list.
- Install and configure Pi-hole:
- Follow the on-screen instructions to install and configure Pi-hole.
- Choose a strong password for the web interface.
- Select your preferred upstream DNS providers.
- Choose the desired blocklists for ad-serving domains.
- Click "Install" to begin the installation.
Configuring Your Router:
- Set Pi-hole as the DNS server:
- Access your router's admin panel via a web browser.
- Locate the DNS settings section.
- Set the Primary and Secondary DNS servers to the IP address of your Raspberry Pi.
- Save your changes.
Testing and Finalization:
- Clear your DNS cache:
- This ensures your devices obtain the updated DNS settings.
- On Windows, open Command Prompt as administrator and type
ipconfig /flushdns.
- On Linux, open Terminal and type
sudo systemd-resolve --flush-caches.
- Browse ad-free:
- Open a web browser and visit websites with ads.
- You should no longer see any ads displayed.
- Customize your experience:
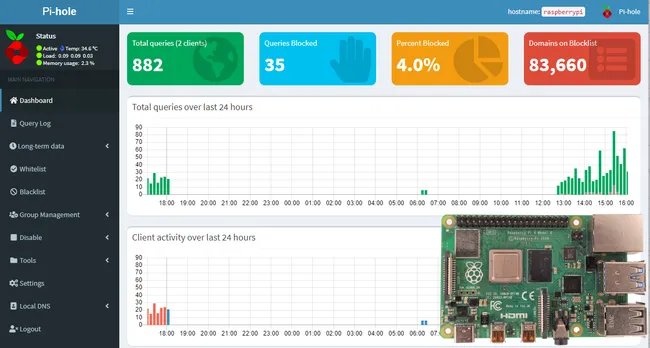
- Access the Pi-hole web interface.
- Explore the various features and settings to personalize your ad blocking experience.
- You can add specific domains to blacklists or whitelists for more precise control.
- Monitor network activity and blocked domains through the dashboard.
Additional Tips:
- Use a Raspberry Pi with built-in Wi-Fi for easier network access.
- Consider a static IP address for your Raspberry Pi for stability.
- Regularly update Pi-hole for bug fixes and new features.
- Explore the Pi-hole community forums for support and resources.
Enjoy a cleaner, faster, and more secure browsing experience across all your devices with your Raspberry Pi ad blocker! Remember, blocking ads also helps protect your privacy and reduce data consumption.
What's Your Reaction?